另外在安裝上由於透過AWS Microsoft AD與SQL Server AlwaysOn這二個選項安裝時,在建立Availability Group Listener會遇到一些問題,所以本篇也特別說明如何排除,再請參考。
建立步驟:
一、環境安裝與建立
1、請先點選下列的網址 -> Launch Quick Start (for New VPC),進行建立。
SQL Server on the AWS Cloud: Quick Start Reference Deployment
https://docs.aws.amazon.com/quickstart/latest/sql/welcome.html
2、透過範本的方式快速的建立,在此請先確定你要建立的Regions為何,另外可以在下方看到範本的位址,當然如果你有興趣,也可以自行下載進行修改與調整。
3、在此由於我以簡單的二個節點進行安裝,所以在Availability Zones我只選擇二個,另外關於每個節點的劃分,如沒有特別的規劃,可以使用預設值即可。
4、選擇自已的Key Pair,此處可以選擇已存在此Regions的Key Pair,如果沒有新增的話,請記得先行設定。
5、在此處,我們選擇使用AWS Directory Service for Microsoft AD,當然你也可以選擇Microsoft AD on Amazon EC2的方式進行,此時系統會自行建立二台EC2 for AD進行。
6、選擇Microsoft SQL Server的版本,目前可以選擇的有2014、2016、2017的版本可以選擇。
7、最後勾選確認後,即可開始進行。
8、切換到CloudFormation,確認是否已建立完成,約不到30分鐘的時間,一個AD服務與四台EC2都已建立完成。
9、切換到EC2的頁面,你也可以看到4台EC2也確認都建立完成了。另外RDGW是主要負責對外連線的電腦,所以我們要透過此電腦進行連線。
10、透過RDGW,然後再連到Node1進行確認,你可以看到此時二台的SQL Server皆已安裝完成。
1、請先手動建立一個測試用的資料庫,並請確認複原模式為Full,建立完成後也請手動進行一次完整備份。
2、此時如果你直接進行AlwaysOn安裝的話,由其是在建立Listener,你會遇到下列的錯誤,所以我們要先作一些設定。
錯誤訊息:
Create failed for Availability Group Listener 'carylistener'.
The WSFC cluster could not bring the Network Name resource with DNS name 'carylistener' online. The DNS name may have been taken or have a conflict with existing name services, or the WSFC cluster service may not be running or may be inaccessible. Use a different DNS name to resolve name conflicts, or check the WSFC cluster log for more information.
PS:此問題我原先是懷疑是否是已有存在相同的名稱,但是一來這是新建的AD,二來透過不同的名稱建立也是相同的情況,所以排除此情況的可能性。
3、此時我先透過RDGW的機器安裝AD的管理工具,藉以進行管理AWS Microsoft AD。
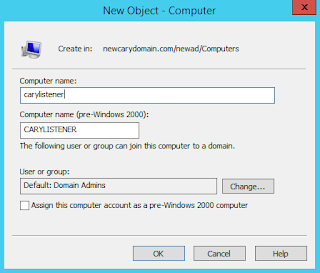
4、安裝完成後,請開啟Active Directory Users and Computers,並連線到AWS Microsoft AD -> AD的OU名稱 -> Computer。
5、選擇新增Computer物件。
5、啟用進階設定。
6、選擇建立好的Listener -> Properties -> Security -> Add -> Cluster Name -> 並請將下列的權限進行賦予,或是你也可以直接給予Full Control的權限。
建議權限:
Read
Allowed To Authenticate
Change Password
Receive As
Reset Password
Send As
Validate write To DNS Host Name
Validate Write To Service Principle Name
Read Account Restrictions
Write Account Restrictions
Read DNS Host Name Attributes
Read MS-TS-GatewayAccess
Read Personal Information
Read Public Information
7、連線到主要的節點上,選擇Availability Groups -> New Availability Group Wizard
8、在Replicas的部份請記得將二個節點都加入,然後切換到Listener的部份,名稱請使用在第5個步驟中設定的名稱,而IP請選擇各節點中的Secondary Proviate IPs中的第二個加入。
第一個節點

第二個節點
10、檢查並確認Listener建立完成。
上述的方式提供給大家不同安裝AlwaysOn的方式,依照上述的設定,其實真的不用10分鐘就可以建立完成(不包含等待的30分鐘),而且跟自已手動建立的,真的沒有其他的不同,推鑑下次大家可以參考看看。
參考連結:
SQL Server on the AWS Cloud: Quick Start Reference Deployment
https://docs.aws.amazon.com/quickstart/latest/sql/welcome.html
Create Listener Fails with Message ‘The WSFC cluster could not bring the Network Name resource online’
https://blogs.msdn.microsoft.com/alwaysonpro/2014/03/25/create-listener-fails-with-message-the-wsfc-cluster-could-not-bring-the-network-name-resource-online/
Create Availability Group Listener Fails with Message 19471, ‘The WSFC cluster could not bring the Network Name resource online’
https://blogs.msdn.microsoft.com/alwaysonpro/2013/10/30/create-availability-group-listener-fails-with-message-19471-the-wsfc-cluster-could-not-bring-the-network-name-resource-online/


作者已經移除這則留言。
回覆刪除您好,很謝謝您的分享... 最近在驗證SQL alwayson,看到這個也試做了一遍~ 但遇到個問題,想請教一下,當我連到 node1 時,連SQL server都無法連接? 請問會是什麼問題? 謝謝
回覆刪除I enjoyed reading this article and consider it educational. The introduced method is a quick installation method and I really enjoyed following it.
回覆刪除There will be some problems in establishing the Availability Group Listener, so this article also explains how to exclude, that is why we are referring to it.
回覆刪除